 |
Tori's Fun and Games!
I always have a busy week! I do lots of projects. You can do them too. I have a new project each week to tell you about.
Dec. 20, 2000
Ocean in a bottle!
This is a great project that benefits both older children and their younger sibblings. The older ones get the fun of making the project, while the younger ones enjoy playing with the finished result. Little ones are facinated with this.
You Will Need:
- Food Coloring
- A Funnel
- A clear plastic jar or bottle with a lid.
- Clear colored cooking oil.
- (Optional)Fish-shaped sequence or beads.
- (Optional for Adult)Glue... hot glue works best.
|
Directions:
- Using the funnel, fill the bottle about 1/3 of the way with water.
- Add a few drops of food coloring (blue or green... or blue AND green) to the water.
- Add the "fishies" if desired.
- Fill the rest of the bottle with the cooking oil.
- Place hot glue on the sides of the lid, then quickly screw the lid on the bottle. Let dry
- Now you can turn the bottle on its side, rocking it back and forth to make waves! :)
|
|
Sept. 11, 2000
Bottle Sand Painting!
You can use your left-over sand from last week's project to make a beautiful piece of art. This takes a little concentration on the part of your child, but it's fun. Totally worth it!
You Will Need:
- Your spare colored sand in serveral colors
- A Funnel
- A clear glass or plastic jar or bottle with a lid.
|
Directions:
- Lay some newspaper out in your work area.
- Put the funnel inside the jar.
- choose one color of sand and pour a little of it into the funnel.
- Watch the sand fall into the jar.
- Repeat the process using different colors. Creat patterns and shapes with the sand
- When the bottle is almost full, put the lid on, and enjoy your creation.
|
|
Sept. 4, 2000
Sand Painting!
If you want more vibrant colors for this project, you might want to buy the sand you find at the craft store. This process is more fun if you dye your own, though.
You Will Need:
- Either food coloring or powdered paint
- Soft Sand (we live in the desert, so it's easy to find here! :))
- Glue
- Cardboard
- Paintbrushs
|
Directions:
- To dye the sand, place the sand and either the food coloring or the powdered paint into a closed containter (I've used film canisters, butter containers, and "Cool Whip" containers). Close the lid, and shake! Add as much food coloring as you need to get desired result.
- Repeat process for each color.
- Draw a picture or design on the cardboard.
- Put the cardboard on top of some newspaper. This will help you clean up the sand.
- This takes some planning: You must decide which parts of your picture need a certian color: IE. If you decide 3 sections need blue, paint only the blue sections with glue. Pour the blue sand over those sections, then shake off into its container.
- Wait til the glue dries, then repeat, using a different color on the next section.
- Repeat til the picture is finished... After it dries, it will be ready to hang!
- For little ones, you might just have them "draw" with the glue, and cover the drawing with sand.
|
|
August 12, 2000
"Stained Glass" Light Catchers!
This one needs adult supervision!
You Will Need:
- Wax Paper
- Old Crayons Without Paper Wrapping
- Cheese Grater
- Iron
- String or Ribbon
|
Directions:
- Shave the crayons into a bowl using the cheese grater. Pick out color combinations you like.
- Cut two pieces of wax paper the same shape and size.
- Sprinkle crayon shavings on one piece of the wax paper.
- Place the second piece of paper over the shavings.
- Iron the top of the wax paper. Watch the crayons melt.
- Punch a whole in the wax paper creation and thread the ribbon through. hang up near a light source to enjoy the colors!
|
|
June 10, 2000
Bubble Wrap Party!
This one was more for Tori's little sister, Danielle, who loves to dance. These are two projects that use Bubble Wrap.
You Will Need:
- Bubble Wrap
- Tape
- Paint
- Paper
- Paintbrushs
- Music
|
Directions:
- For Poject 1, tape some bubble wrap to the floor with stong tape (like duct tape).
- Turn on some fun music, and dance on the bubble wrap. Be prepared to make LOTS of noise!
- For Project 2, tape the bubble wrap on a covered table.
- Paint the bubble wrap different colors.
- Place a peice of paper on the bubble wrap while it's still wet.
- Lift the paper and see the print!
|
|
May 6, 2000
Easter Eggs!
I liked making the eggs!!!!~Tori
Yes, I know it's late for Easter, but the dinosaur foot project reminded me of another lesson we did in the dinosaur unit. For Tori, we used little animals, but you can use dinosaurs, candy, little cars, ect. This project might take 2 days, so please use your patience. ~Aunt Janet
You Will Need:
- Balloons
- Small plastic animals or candy... must be small enough to fit inside the balloon
- Shredded Paper
- Glue
- Water
- Paint
- Scisors
- Easter Grass
|
Directions:
- Take the little toy and fit it inside the balloon.
- Blow the balloon up and tie it. Have a grown-up help.
- Mix 2 cups of glue with 2 cups of water in a large bowl.
- Dip the shredded newspaper in the glue mixture.
- Place the wet shreds of paper on the balloon, till it's covered. This is the egg.
- Let the egg dry.
- Now you can paint your egg any way you like. Be creative.
- Pop the balloon inside the egg by sicking a pin through the egg.
- Cut the egg in half. What do you see inside? Make sure you throw the popped balloon away!
- You can place easter grass in the egg, and place your new "baby" in the egg so it can sleep.
|
|
May 4, 2000
Dinosaur Hand Prints, Feet Prints!
Dinosaurs were GIGANTIC!!!~Tori
I did this with my preschooler when we studied dinousaurs. It was a great way to learn about measurement in a simple manner. It was fun for Tori and her sister to do, too. .~Aunt Janet
You Will Need:
- A Large Piece of Paper (butcher paper works best.
- Marker
- Paint (preferably mixed with liquid soap)
- A tray to put the paint in.
|
Directions:
- Draw a "dinosaur foot" that's about 2 1/2 feet long and 2 feet wide.
- Let each child stick their feet in the paint
- Have them place their painted feet inside the dinosaur foot.
- See how many of the children's feet will fit inside the dinosaur foot.
|
|
April 12, 2000
Cool Valcano!
This was really cool!!!~Tori
I love doing this experiment. The kids will want to do it over and over, so make sure you have lots of supplies. I find it's best done outside, as you can get carried away with the baking soada.~Aunt Janet
You Will Need:
- Liquid Soap
- Baking Soda
- Vinigar
- A coke bottle
- Funnle
- Measuring spoon
- An open container (like a a cake pan or tub) to hold the coke bottle
- Red food coloring.
|
Directions:
- Place the empty bottle on the container.
- Using the funnel, pour about 1/2 cup of vinigar in the bottle.
- Add about 1/4 cup of liquid soap.
- Also add a few drops of food coloring
- Shake the bottle to mix the ingredients.
- After it's mixed, add a little baking soda. Stand back, and watch the fun! What happened?:)
|
|
March 4, 2000
Coke Bottle Bowling!
This was fun!~Tori
Tori loves to bowl... it's in her blood. When we can't go to the bowling alley, this is the next best thing. ~Aunt Janet
You Will Need:
- 10 empty 20 oz plastic Coke Bottles
- Sand.
- A large ball.
|
Directions:
- Clear a spot either outside on your sidewalk or in your house.
- Fill the bottom of each Coke bottle with a little bit of sand... only enough to stablize the container. You can also use water. These will be your "pins". You can decorate the bottles with markers, stickers, and paint if you wish.
- Set the pins up in a triangle shape. One pin in front, the two behind, then three pins behind that, the. The rest of the pins go in the last row.
- Stand back and roll the ball to knock down the pins. The person who knocks down all the pins first... wins! With an older kid, you might want to keep score, as you do in a traditional game of bowling.
|
|
January 4, 2000
Pretty Button Strings!
We made buttons today, like Laura and Mary in the book Aunt Janet read me.
We read On the Banks of Plumb Creek together recently and were inspired by the necklace Laura and Mary made for baby Carrie in the book. It was delightful discovering all the antique buttons we found in my grandmother's button tin. ~Aunt Janet
You Will Need:
- A Collection of Buttons, either new ones or ones slavaged from your grandmother's attic.
- A Dull Needle
- Thread, String, or Ribbon
|
Directions:
- Look through your button collection. Choose about ten buttons you like.
- Thread your needle with the string. Have your grown-up help you.
- Tie the bottom of the string to keep the buttons from falling off.
- Push the needle through a hole in the buttons. Keep doing this until all the buttons are gone.
- When you are done, you can wear your button string as a necklace, or just string it up on the wall, ect.
- Experiment with patterns, make up stories about the buttons, or try to identify what clothes they came from. This activity can stimulate some great memories! :)
|
|
June 20, 1999
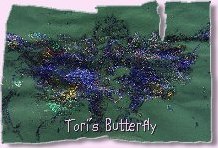 Magical Glitter Butterfly
The butterfly is for Aunt Lizabeth.~Tori Magical Glitter Butterfly
The butterfly is for Aunt Lizabeth.~Tori
This fun and simple project will surprise your child. They may want to do it over and over again. You'll have a whole collection of butterflies before they are done!
You Will Need:
- Colored construction paper
- Crayola glitter glue in several colors.
- A paint brush
|
Directions:
- Pick out a piece of construction paper.
- Place it in front of you, landscape style. Fold it in half and then open it so that you can see a folded line down the middle of the paper.
- Squeeze different colors of glitter glue on one side of the paper.
- Swirl it around with your paint brush
- While it's still wet, fold your paper over, smothing it down.
- Here comes the magical part! Open it up. What happened?
|
|
June 12, 1999
Potting Soil Fun!
The dirt is black. It makes the flowers grow. It is ewie-gooy-messy.~Tori
It is a fun learning experience for little ones to explore the properties of mud, dirt and water. It's a great sensory experience and helps them learn basic science concepts. It might be a good idea to do this project before you begin gardening. ~Aunt Janet
You Will Need:
- A Bag of Potting soil
- A large tupperware, plastic or metal container. I like to use a large bucket or those containers you get from the hospital.
- A Spade or shovel
- A watering can, some cups and bowls
- A little rake, ect. Any tool the children can use to explore with.
- *Optional* Water
|
Directions:
- Set up a spot outside with the large container and the cups, shovels, ect.
- Fill the container with your potting soil.
- Explore! Empty and fill the cups, dig holes, run your hands through it. Notice what happens when you dig the holes. Is the soil loose or packed tightly? How does it feel? What colors are in the soil?
- Burry things in the soil. See if you can find them. What happens when you find them? Do they come out of the soil clean or dirty?
- After you've explored the potting soil while it's dry, try mixing it with water. What happens to the soil when you water it? This will be messy! Be sure to keep the soil inside the container.
- After all this exploring it's time to clean up. Empty the soil in your garden. Wash your hands and wipe up any spills.
|
|
June 5, 1999
My Own Garden
I have pretty flowers in my garden. I like the dirt and I can water them with Aunt Janet's watering can.~Tori
You Will Need:
- Sterile potting soil
- One or two 6 packs of flowers (easy growing plants like cosmos, marigolds or petunias are best)
- A Spade
- A watering can
- A "little bit of earth"
|
Directions:
- Find a sunny spot to plant your flowers. Flowers need sun to grow.
- Dig 1 hole for each plant, about 6 inches apart and deep enough so that the plant will fit.
- Fill the bottom of the hole with the potting soil. This will help the plants grow roots.
- Gently remove the flower from the container.
- Put the flower's roots in the hole and cover the roots with left over dirt and soil. Make sure the leaves and the flowers are above ground!
- Water your flowers. Make sure you water them every day for about 2 weeks so they can adapt to their new home.
|
|
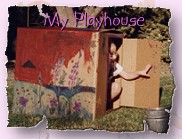
May 9,1999
A Playhouse!I made a playhouse. I painted a box with pretty, pretty colors. It was messy fun! I play with pillows and blankets and my babies because I am Mommy. ~Tori
You Will Need:
- A cardboard box large enough for children to climb into.
- Nontoxic Poster Paints
(These paints are supposed to be stain-proof, but sometimes the paint is very hard to get out of clothes. Mixing them with a nontoxic detergent makes cleanup so much easier. It also makes the paint bubbly, which is fun for little children!)
- Paint Brushes
- Newspaper (optional but recommended)
- A Knife or Sharp Scissors (for the adult!)
- Pillows and Blankets (optional)
|
Directions:
- Wear old clothes or a smock. Take your box outside and set upon the newspaper, which should be spread out on the lawn.
- Have your grown-up cut a hole for windows and a hole for the door. Tell Mommy and Daddy what shape the holes should be.
- Use the paintbrushes to paint your house. Have fun! Sometimes it's fun to use your hands!
- After the box dries, and you have cleaned up your mess, put some old blankets and pillows in the box.
- Have a great time pretending!
|
|
May 2, 1999
A Simple Kite
Last week I made a kite. It flies and flies in the wind, but you have to run hard. I like my kite.~Tori
This idea is special because Tori came up with it all by herself. After seeing a kite on television, she decided to make her own. She looked about the house for the different materials. She had to improvise quite a bit. It made her kite all the more special. When doing these projects encourage your children to be creative and think for themselves. The fun is in making, doing, and discovering, not in how well the project turns out. ~Aunt Janet
You Will Need:
- A piece of paper cut into a square 8"1/2 X 8"1/2
- Crayons, markers or paints
- 4 straws
- Tape
- String (I used a shoe lace for my first kite, but Pappa got me some kite string from the store for my other one.)
|
Directions:
- Make sure your paper is cut in a square. Use the paints, markers or crayons to decorate the paper.
- Put one straw along each side of the square.
- Tape the straws to the paper.
- Tape the string to the paper. Mare sure the string will hold on tight!
- Now you can take it out to fly.
|
|
April 24, 1999
My Special Photo Album
Sunday and Monday I made a photo album. My book had angels and Christmas and stickers and my baby, and mommy and daddy on it. This is how I did it:
You Will Need:
- A Small Photo Album with a plain cover
- Alphabet Stickers
- Photos that are special to you
- Sticker Labels
- A Pen or Marker
|
Directions:
- Use the Alphabet Stickers to decorate the front of the album. Have mommy and daddy help you spell out your name with the stickers.
- Decorate the inside with the rest of the stickers. This part is lots of fun!
- Carefully put the photos in the slip covers. Make sure they all face the same way.
- Put the labels on the pages. Tell mommy and daddy about the photos. They can write down what you say.
- Now you have your own book all about you! Ask your mommy and daddy to read it to you.
|
|
You are kid # 7966
to visit Tori.
Back to Tori's Tales

Background designed exclusively for this site.
© 2000 Janet L Hill |